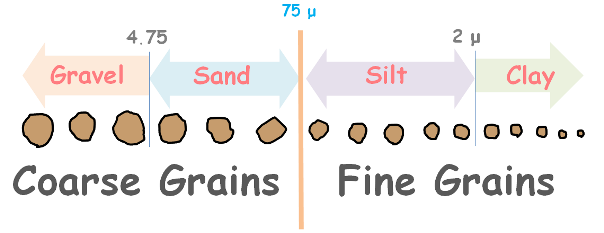
Soils are generally divided on the basis of their particle size into coarse grained and fine-grained soils.
Coarse-grained soils are of particle size greater than 0.075 mm or 75 micron and particles smaller than this make up fine-grained soils.
Further coarse grains are divided into gravel and sand, and fine grains are divided into silt and clay sized.

Gravel sized particles are larger than 4.75mm and sand particles are between 4.75mm to 75 micron.
Silt sized particles are of size 75 micron to 2 micron, and clay sized particles are of size less than 2 micron.
To identify the type of soil in the field, first we try to distinguish the soil as coarse grained soil and fine grained soil and we can do so by simply looking at the soil.
We take the soil sample and spread it on a flat surface. If we can see the grains of the soil through our naked eyes, provided naked eyes must not be the defective, and if we are able to separate them, those are the coarse grain particles. On the other hand if we are not able to do so, then those are fine-grained particles. These particles are microscopic and are not visible through the naked eye.

Through visual inspection we may get the idea of whether the soil we just spread contains more than or less 50% of visible particles.
It contains more than 50% of visible particles then the soil is coarse grained soil and if the soil contains less than 50% of visible particles then the soil is fine grained soil.
After identifying soil as coarse and fine-grained we can further separate them as gravel, sand, silt or clay.
From our soil sample if we pick up a soil particle clearly visible like a pebble, roughly larger than 5 mm, then it is gravel particle and if it appears smaller it is sand particle.
Particles smaller than sand are microscopic and are either silt or clay. We need to perform a couple of tests to distinguish between them.
Let’s begin with
Sedimentation
For sedimentation we take a spoonful of soil sample and mix it in a jar full of water. We shake the jar to make the soil suspension.
 Now the jar is placed on the flat surface and the suspension material is allowed to settle. We will notice that suspended particles settle in layers. The gravel and coarse sand will settle almost immediately to the bottom and fine sand will take around 1 to 2 minutes to settle. The silt will take about an hour and the clay will remain suspended for even longer period of times.
We can estimate the relative quantity of each component (sand, silt, and clay) by comparing the relative thickness of each of the layer at the bottom of the jar.
Dilatancy or Shaking Test
Silt soils are more permeable than clay soils. Using this property we can perform another test to distinguish between these two, called Dilatancy or shaking test.
We add water to our soil sample so as to nearly saturate it. A small pat of this soil is placed in the palm of the hand and vigorously shaken horizontally, striking against the other hand several times.

If the surface of the soil becomes glossy in appearance it is an indication that moisture present in the sample has risen to the surface.
If the soil surface becomes shiny this way quickly, then soil contains silt or very fine sand, and if soil surface does not become glossy at all, the soil is probably clayey.
If this glistening of surface occurs slowly, we can infer the soil is predominantly silt with possible small amount of clay.
Dry Strength Test
We also perform Dry Strength Test to distinguish between clay and silt
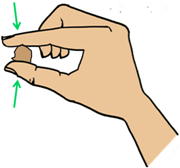
 For that we completely dry our earlier used soil sample in sun or air due to which lumps are formed in the soil. These lumps are pressed between thumb and forefinger and the resistance of these lumps to breaking is termed as dry strength.
We describe the strength as very low, medium, or high.
If a dried soil lump can be powdered easily without application of much force, it is said to have a low dry strength and such soil may contain fine sand and silt.
If considerable finger pressure is required to break the lump, it possesses medium dry strength and that soil contains silt with few amount of clay.
If the dried soil lump cannot be powdered with fingers at all, it is has high dry strength and we can be sure that soil contains appreciable amount of clay.
Ribbon Test
We also perform a Ribbon Test to distinguish between silt and clay
 In this test we take some soil in hand and add some water to it to make workable. Then we press it slowly between the thumb and index finger to make a ribbon like shape of about 3 mm thick and as long as it can be formed before it breaks itself under its own weight.
If we could form a ribbon of longer than 100 mm then soil contains high amount of clay.
While silt and other non-plastic materials cannot be moulded into ribbon at all.
Plasticity Test
Then there is one more test to distinguish clay and silt which is Plasticity Test
We performed this test to determine the plastic limit of the clayey soil.

We mix water in the soil sample and over saturate it. Then we take a soil pat into hand and roll it into a thread. If we manage to roll the soil pat into long threads of diameter as small as 3 mm without cracking the soil contains high clay content. While soils containing Silt can seldom be rolled into threads of such a small diameter without severe cracking.


