You planned to build a single storey building, but after construction, you thought, why not add one more. Then, you had an idea, why not convert it into a hotel and add even more floors? Now, you’re envisioning a towering hotel of your own. But how high can you really go? You just hope your hotel doesn’t become the next ‘Leaning Tower’ or a viral construction failure.
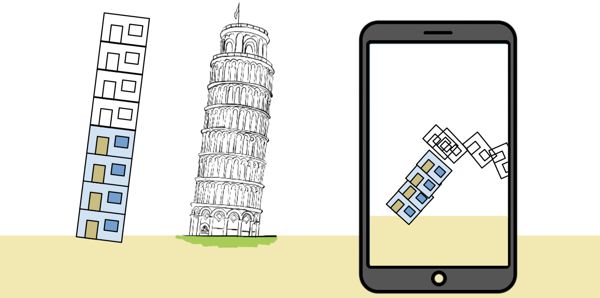
Well, there’s a test — the Plate Load Test — that can actually tell you how far you can go… but only before you start construction.
Structures can fail for many reasons — poor design, bad materials, unexpected loads or even an earthquake. But sometimes, the problem isn’t what’s above the ground… it’s what’s below it.
All the load of a building — its walls, columns, beams, and everything inside—is ultimately supported by the soil below. If the soil can’t handle the load, the building is in trouble. The entire structure could sink, tilt, or even collapse over time.
The maximum load that a soil can safely support is called its Bearing Capacity. And we can determine this maximum capacity using the plate load test. The Plate load test also tells us how much the soil will compress or settle under a given load.
The Plate Load Test is as simple as putting your hand on the soil and pressing it to see how strong it is. If your hand sinks into the soil, it may be soft and weak. But if your hand stays firm, no matter how hard you press, the soil is strong.

In the Plate Load Test, instead of estimating soil strength with your hand, we use a heavy metal plate.

The plate used in the test can be either square or circular. Circular plates are typically used for testing circular footings and in road pavement evaluations, while square plates are used in most other cases, including foundations for buildings.
The plate size ranges from 300 mm to 750 mm. Smaller plates are used for dense or stiff soils, whereas larger plates are preferred for loose or soft soils to better represent actual foundation behaviour. It is made of steel and typically 25 mm thick.
To conduct the test, we dig a pit that’s about five times the size of the plate in both length and width. So, if the size of the square plate is Bp x Bp, the size of the pit will be 5Bp x 5Bp.
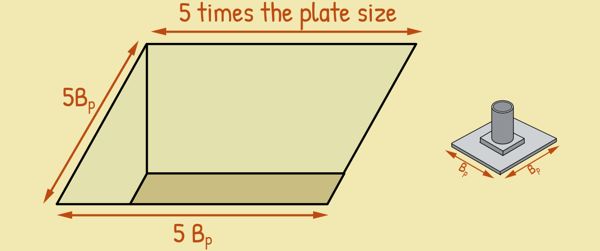
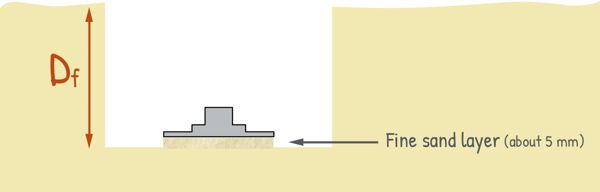
Also, the depth of the pit has to be the same as where the foundation will be built. This way, we can test the soil at the exact same level where it will support the structure. Lets say depth of the foundation and the pit is Df.
At the centre of this pit, we spread a thin layer of fine sand of about 5 mm and then place our test plate on top of it. This sand layer ensures uniform contact between the plate and the soil, helping to distribute the load evenly and prevent any gaps or uneven pressure.
If the water table at our test site is above the level of the test pit, the pit will fill with water. In that case, we need to pump out the water and lower the water table to the level of the foundation before placing the test plate.

Once the test plate is in place, we apply the load. There are two common ways to do this:
- Gravity loading
- Reaction loading.
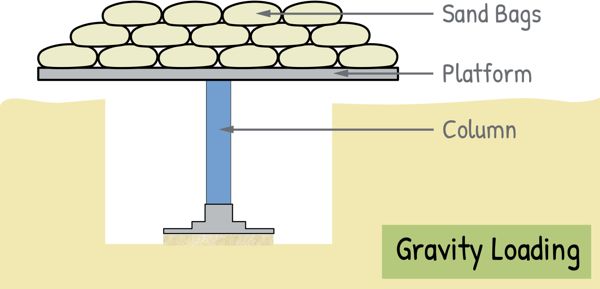
For Gravity Loading, we build a platform on a vertical column that sits on the plate. We then place sandbags on the platform to apply the load. The weight of these bags creates the necessary pressure.
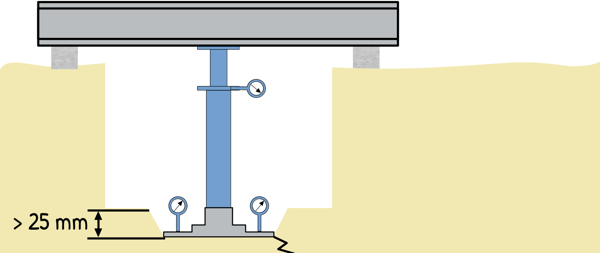
In Reaction Loading, we use a hydraulic jack to push down on the plate. But for this to work, the jack needs something to push against — like a strong reaction beam or truss. A proving ring is used to measure how much force is being applied.

We also fix a minimum of two dial gauges on the plate to measure how much the soil settles under the applied load. These gauges are fixed at diametrically opposite ends of the plate so we can detect any tilting or uneven settlement.
Before starting the test, we apply an initial pressure of 70 g/cm² to the plate. This is called the seating pressure. It ensures that the plate is fully in contact with the soil and compacts any loose material directly beneath it. This helps achieve uniform contact and eliminates any initial irregularities or voids.
Now, we begin our test by gradually increasing the load on the plate. The load is increased in steps of either 1 kg/cm² or one-fifth of the estimated ultimate bearing capacity — whichever is smaller.
At each load increment, we record the settlement of the plate at specific time intervals: 1, 2.25, 4, 6.25, 9, 16, and 25 minutes, and then at hourly intervals. Initially in few minutes and then at hourly intervals.
If we are testing clay, we continue recording for 24 hours since clay settles slowly over time. If the soil is other than clay, we stop recording when the rate of settlement becomes very small and drops below 0.02 mm/min. But the load is kept for at least an hour.
After recording the settlement for the current load, we increase the load again and repeat the entire process. We continue this cycle until the plate settles by 25 mm or the soil fails, whichever happens first.
Using the data recorded, we plot a load-settlement curve on a normal arithmetic scale. The type of curve we observe depends on the type of failure occurred in the soil.
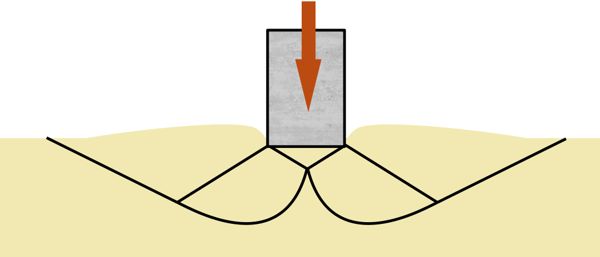
Different types of failure in the soil are discussed here.
The curves obtained :
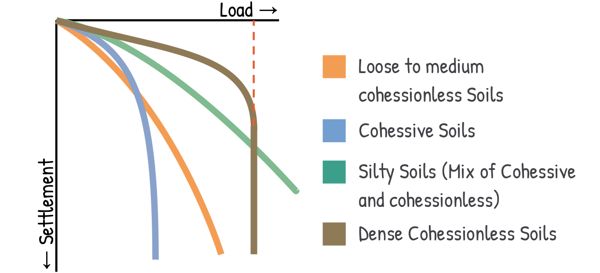
For loose to medium cohesionless soils, the curve starts as a straight line but gradually flattens out, showing no clear failure point.
For cohesive soils, the curve is not quite straight in the beginning but leans towards the settlement axis as settlement increases.
For silty soils (which have a mix of cohesionless and cohesive properties), the curve behaves like a blend of both.
For dense cohesionless soils, we observe a curve where a clear failure point is visible.
So, in dense cohesionless and cohesive soils, failure is obvious. But what about soils where it’s not? When the curve doesn’t show a clear failure point, we plot the data on a logarithmic scale instead.
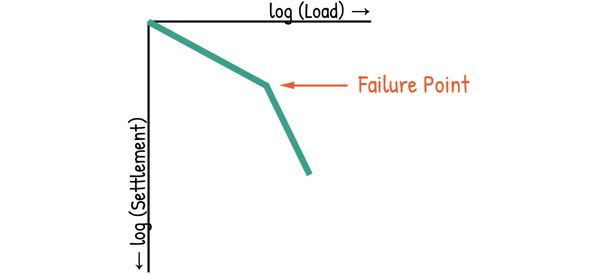
On this scale, the data often forms two straight lines, and where these lines intersect is considered the failure point for the soil.
The failure points on these curves represent the ultimate bearing capacities of the soil for the test plate, often denoted as qu(p).
But our actual footing for the structure will be much bigger than this small test plate, right? So, how do we figure out the ultimate bearing capacity for the real footing in our structure? Well, we have some formulas for that!
For clayey soils, the ultimate bearing capacity doesn’t depend on the size of the footing. Therefore, the ultimate bearing capacity of the plate and the actual footing will be the same:
![]()
But for sandy soils, the ultimate bearing capacity depends upon the size of the footing. So, to scale up from our test plate to the actual footing, we use this formula:
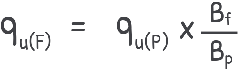
Where Bf is the width of our actual foundation
We also recorded the settlement for each load during the test, and this data can be used to estimate the settlement of actual footing for a given intensity of loading.
The relations between the settlement of the plate (SP) and that of the foundation (SF) for the same load intensity are as follows
a) for clayey soils :

b) for sandy soils

Merits of the Test:
The plate load test offers several benefits.
1. It directly measures the bearing capacity and settlement of the soil, making the results straightforward to interpret.
2. Compared to laboratory tests, this test gives quick, real-world insights into how the soil actually behaves under load.
3. Another great thing about the Plate Load Test is its versatility. It works on different types of soil — whether it’s cohesive clay or loose sand — making it useful for various construction projects.
4. It simulates actual loading conditions, providing valuable insights into how foundations will perform under real-world loads.
5. The test is also commonly used in transportation engineering, particularly in assessing the strength and stability of the subgrade, ensuring that roads and pavements can withstand traffic loads without excessive settlement
6. It can even be used to check if the soil in embankments or pavements has been compacted properly!
Limitations of the Test
But of course, the Plate Load Test isn’t perfect — it has its limitations.
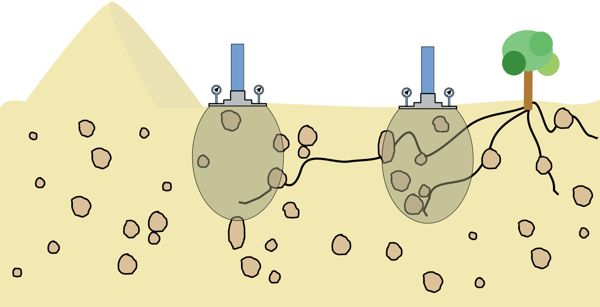
1. It only evaluates the soil within 2 to 3 times the plate width (Bp). That means it’s great for shallow foundations but not so reliable for deep foundations like piles or deep footings where the behavior of deeper soil layers is crucial.

2. Then there’s the test plate itself. Since it’s much smaller than actual foundations, the results might not always perfectly represent how a large footing will behave under load. This can lead to potential discrepancies in the results, as the scale effect might not fully capture the real-world conditions.

3. Clayey soils take a really long time to settle under load. But in this test, we only allow 24 hours per load increment for settlement. This means we might not be capturing the true long-term behavior of the soil, which can continue to settle for weeks or even months in reality.
4. If the soil varies significantly with depth or across the site, the results from one test location might not fully represent the entire area.
So, while the Plate Load Test gives valuable insights, it’s best to use it alongside other tests for a more complete understanding of the soil.
So, before you start stacking up floors on your dream hotel, make sure you’re not just building castles in the air. With a plate load test, you can ensure your foundation is as rock-solid as your ambitions.