We can pick up a handful of soil and just by looking at it and feeling it, we can tell a lot about it — its colour, texture and how fine the particles are. And with the right equipments and theories, we can even determine its strength.
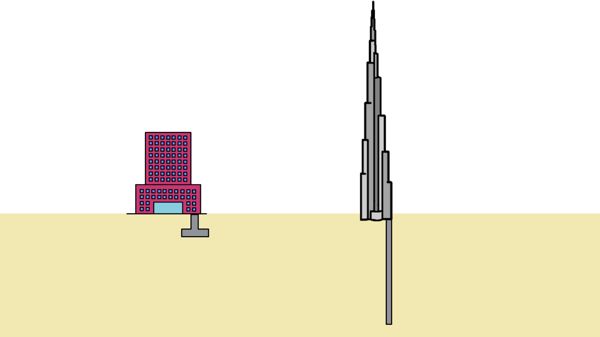
But buildings don’t stand on the surface… they stand a little deeper into the ground. And when it comes to massive structures like the Burj Khalifa, their foundations go even deeper.
Whenever we lay the foundation of any structure, no matter how deep, we evaluate the characteristics of the soil below — just like we did with our hands on the surface. Our purpose of doing so is to know the soil well enough to be confident enough that it can handle the enormous weight above it and keep the structure standing tall for decades to come.
But, how do we know about the soil that we can’t even see or touch?
Well, there are numerous methods engineers use to estimate the characteristics of soil that lies beyond our reach. These methods range from driving cones into the ground with the Cone Penetration Test to measuring seismic waves beneath the surface. But one of the most widely used and reliable methods is the Standard Penetration Test or SPT.

In this method, we literally drill a hole into the ground and bring out soil samples from the depths to see what lies down there. We determine its density, its water content, particle size, texture and everything else that tells us about the soil’s characteristics.
But that’s not all. We actually hammer the soil at that depth to test and assess it’s strength which is also known as its bearing capacity.
To better understand the entire process — how we take out the soil from the hell and how we determine its strength by hammering it — lets dive deeper.

The standard penetration Test, also called SPT for short, is a field test. In engineering drawings, it is often denoted by a symbol : an inverted triangle within a circle. The SPT is a simple and low-cost testing procedure widely used worldwide.
The test is primarily used to assess the engineering properties of soil at different depths. It even identifies different soil layers — sand, clay, silt, gravel, etc. — that lie beneath the surface. Data from this test allows engineers to estimate how much the soil will settle under a given load, helping ensure that the structure remains safe and stable.
The test procedure is also very simple. We take our drilling machine to the site and start creating a borehole in the ground. The size of the borehole is about 100 to 150 mm. The depth of this borehole depends on how deep we need to test the soil— whether we’re assessing shallow layers for small structures or going deeper to evaluate soil conditions for massive constructions.

When we drill a borehole, we often encounter the water table and unstable soils, like non-cohesive loose sand. In such conditions, the soil may collapse into the borehole and we have to dig it again to find the borehole refilled by the same unstable soil again.
To prevent this, engineers use a hollow pipe called a Casing, and insert it into the borehole as they drill.
Sometimes, instead of a casing, engineers use a fluid called drilling mud. This is a special chemical mixture that, when poured into the hole, forms a thin protective layer on the borehole walls.
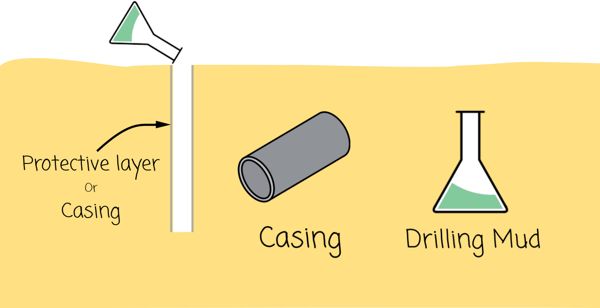
Both methods supports the sides of the borehole and keeps the soil from falling in, allowing us to carry out the test smoothly.
Once the drilling is complete, we insert a special device called the standard split-spoon sampler into the borehole. This sampler is cylindrical in shape and is a hollow tube. It has an internal diameter of 35 mm (1.375 inches) and a total length of approximately 770 mm (30 inches) It is designed to split longitudinally into two halves. The sampler has an open downward face.
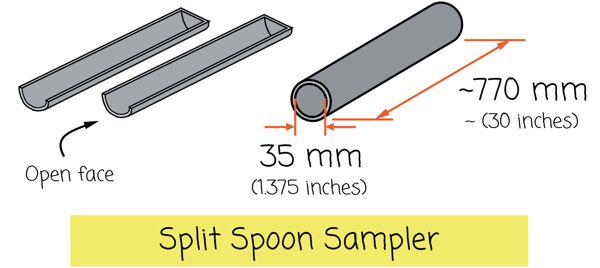
It is designed so because we push the sampler into the ground by use of a hammer and with such a hollow cylindrical design it can collect the sample from the deep. The soil fills the sampler layer by layer as the penetration continues. This ensures that the sample is true representative of the depth being tested.
And when the sampler is brought to the surface, its two halves can be easily separated for an easy extraction of the sample.

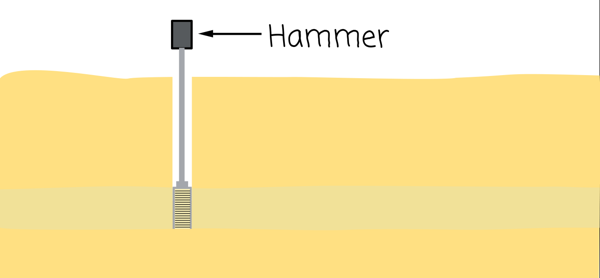
So, once the sampler is lowered to the bottom of the borehole, we note down the depth. At first, we allow the split-spoon sampler to sink under its own weight into the soil.
Next, a hammer of weight 63.5 kg (140 lbs) is raised to a height of 75 cm (30 inches) and allowed to fall freely onto the rods connected to the sampler, driving it deeper into the soil.
We continue hammering the sampler until it penetrates the soil to a depth of 150 mm (6 inches).
How do we know when the sampler has reached 150 mm? Well, there’s a scale marked on the drill rod at the top, that helps us measure the depth.
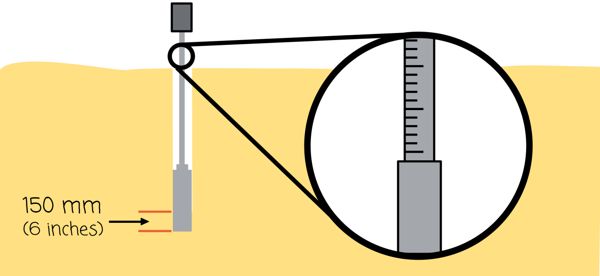
The number of blows required to drive this 150 mm is counted and recorded.
Then, we hammer the sampler again to push it further deep by another 150 mm and record the number of blows for that as well.
Finally, we repeat this process one last time for an additional 150 mm, giving us a total penetration depth of 450 mm (18 inches) and a complete record of the number of blows required for each 150 mm penetration.
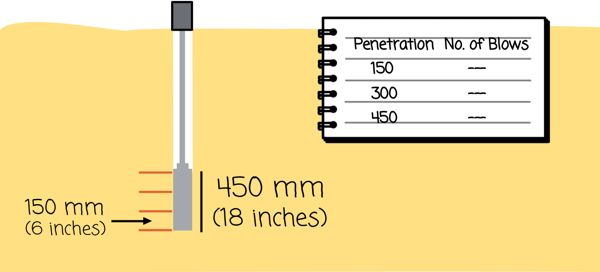
The first 150 mm of penetration is called the “seating drive” and is usually ignored because it’s mainly to get the sampler properly seated in the soil.
While, the number of blows recorded for the last two 150 mm intervals are added together. This sum gives us a number which is called the Standard Penetration Number N.
This SPT number is used to estimate the properties of soil such as its relative density, bearing capacity etc. But we can’t use this SPT number as it is.
Here is why :
Every soil particle experiences a pressure from all directions by the surrounding soil. This pressure is called confining pressure. As we go deeper, the soil becomes burdened by its own weight, which increases the overburden pressure on the soil below. And as the overburden pressure increases, it also leads to an increase in confining pressure. This pressure affects our ability to push the sampler in the ground.
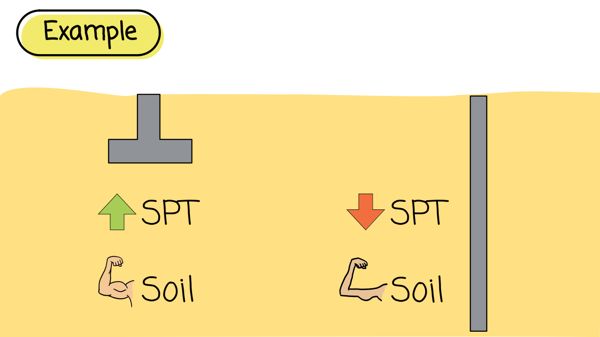
At shallow depths, where pressure from all around soil is less, we can easily push the sampler into the soil. This results in lower SPT Number or number of blows.
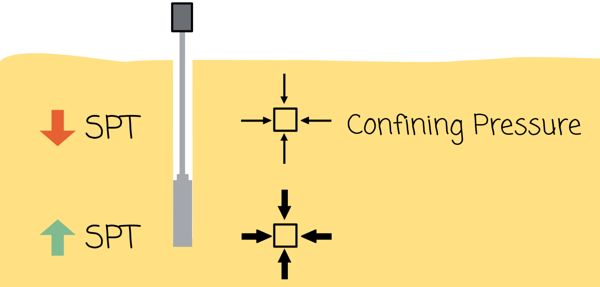
But as we go deeper, soil gets burdened by its own weight and confining pressure increases, the sampler takes more number of blows to penetrate into the soil. This way, we observe higher value of the SPT number for the same soil at deeper depth than at shallow depth. This may result in faulty conclusion of relative density for the same soil.
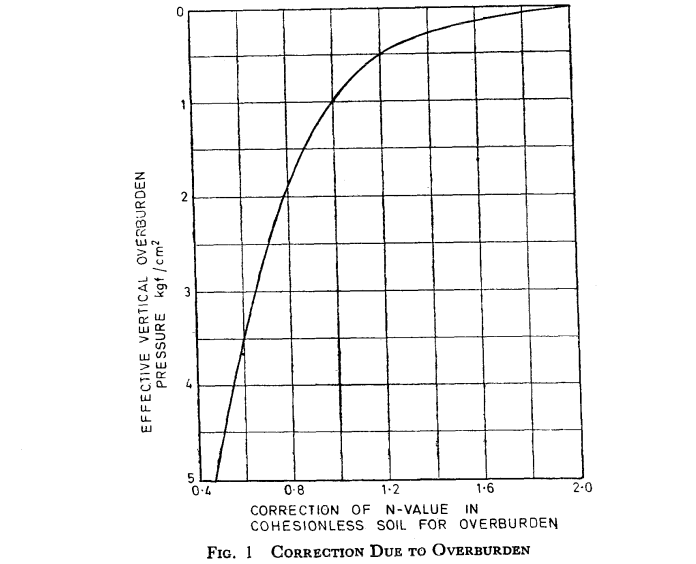
To correct this, we apply what is called overburden correction.
1. Overburden Pressure Correction:
the corrected value of SPT number is given as this :
N’ = CNN
where N is SPT number obtained from the test and N’ is corrected value. This corrected SPT number is also written as N1,
![]()
where N0 is the value obtained from the test and N1 is the corrected value
and CN is the correction factor for overburden pressure.
This correction factor has been proposed by various scientists, each offering different equations tailored to specific ranges of overburden pressure and soil types.
CN = 0.77 log10 (20/σ’)
CN = √ (2000/σ’)
CN = 4 / (1 + σ’) if σ’ <= 0.75 kg/cm2
CN = 4 / (3.15 + σ’) if σ’ > 0.75 kg/cm2
CN = 350 / (70 + σ’)
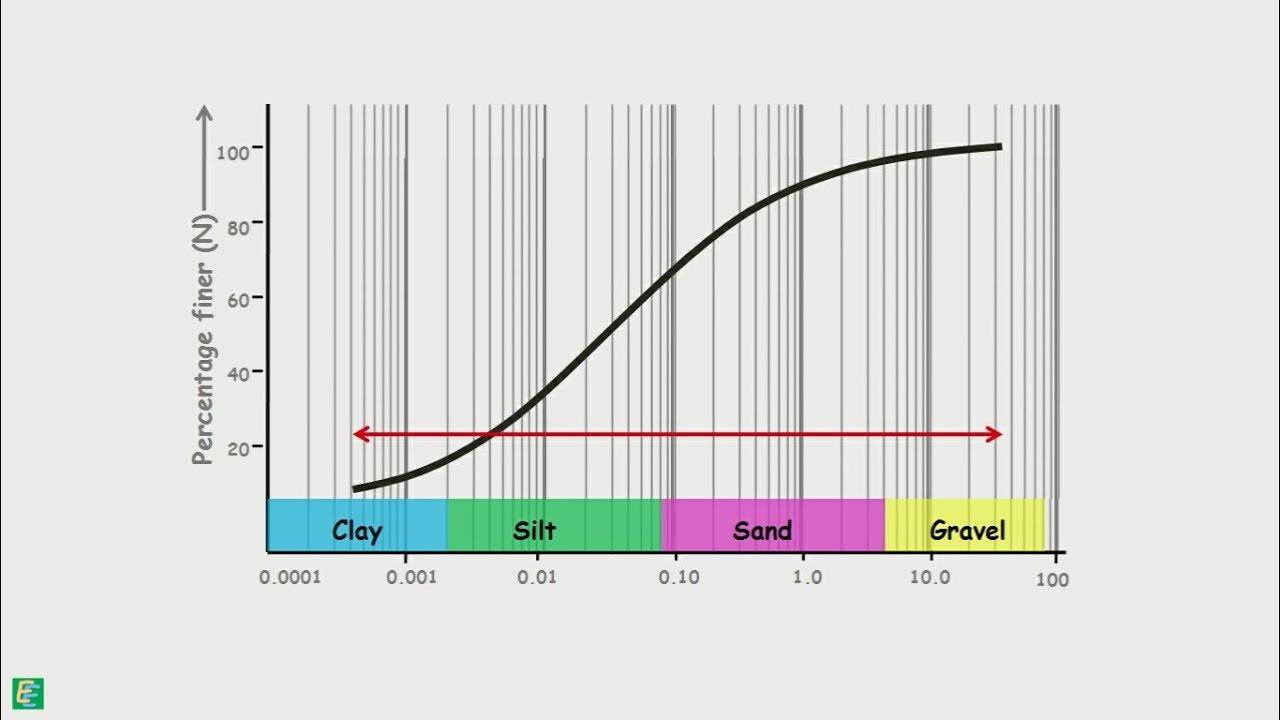
In India, IS Code recommends, use of the following graph, for the determination of correction factor for the overburden.
In addition to this, if water table is present at or above the test level, we also need to apply another correction, called Dilatancy Correction.
2. Dilatancy Correction:
When the hammer strikes the sampler, it pushes the soil, but since this happens so quickly, the water trapped between the soil particles doesn’t have enough time to escape. This trapped water temporarily increases the resistance, making it seem like the soil is stronger than it actually is. As a result, we get a higher SPT number than what the soil normally indicates.

This false increase in resistance due to the trapped water is called dilatancy. To correct for this, we apply a Dialatancy correction to the SPT number obtained after the overburden correction as this.

Where N1 is the SPT number after overburden correction, and N2 is the corrected SPT number accounting for dialatancy.
There are more corrections done to the SPT number, but lets not discuss all of them.
3. Energy Correction
4. Rod Length Correction
5. Borehole Diameter Correction
6. Sampler Type Correction
The N-value or SPT number gives us a direct measure of how resistant the soil is to penetration. In simple terms, a higher N-value indicates stronger and denser soil, while a lower N-value suggests that the soil is loose, soft, or weak.
If we get the N value between 4 and 10 for a cohesionless soil, the soil is classified as loose. If we get the value between 30 to 50 it is a dense soil.
Similarly, we have the whole chart of N-values for both cohessionless and cohesive soils.


The N-value is also used to estimate the bearing capacity — a measure of how much load the soil can safely support. Engineers use standard formulas and empirical correlations to convert the N-value into an estimated bearing capacity. However, since these correlations provide only an estimate, for more precise determinations, it is advisable to conduct shear tests to accurately measure the soil’s strength.
We should note, when the sampler is initially allowed to sink under its own weight, if it sinks entirely without any hammer blows, the SPT value should be recorded as zero.
Additionally, if the number of blows exceeds 50 for any 150 mm drive, it is considered a refusal, and the test is discontinued.
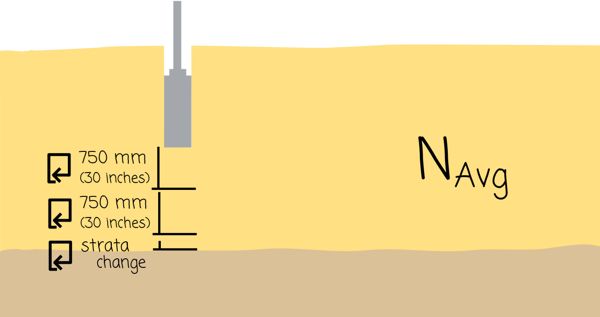
We repeat this penetration test at regular intervals of 75 cm in the vertical direction, or wherever there’s a noticeable change in soil strata. An average N-value is then obtained giving us a comprehensive understanding of the soil’s bearing capacity and overall strength.
Now that we’ve understood the process and importance of SPT, let’s take an example of how it is used in practical applications.
Depending upon the N-values, we may decide to go for either shallow foundations (like footings) or deep foundations (like piles). If we get a higher SPT number, which indicates strong soil, a shallow foundation is sufficient. But when the SPT values are lower, the soil isn’t strong enough to support the load, and we need to go deeper with a deep foundation to ensure the structure’s stability.